All images © 1990-2024 Stampin’ Up!®
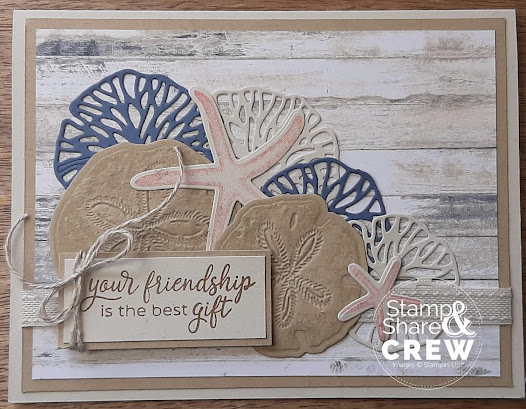
Seaside Wishes Bundle
Measurements:
Basic Beige cardstock: 8 1/2” x 5 1/2” (score/fold to 5 1/2” x 4 1/4” - horizontal orientation)Crumb Cake cardstock First mat (layer 2): 5 1/4” x 4", 5 1/4” x 4"
Country Woods DSP: Second mat (layer 3): 5” x 3 3/4” (Barn wood pattern, oriented horizontally)
Linen Thread: 8” piece
Basic Beige 3/8” Bordered Ribbon: 6”
Misty Moonlight, Crumb Cake and Basic Beige cardstock: scraps
Instructions:
- Adhere 5” x 3 3/4” Country Woods DSP to 5 1/4” x 4" Crumb Cake cardstock.
- With Tear & Tape, attach the Basic Beige Ribbon horizontally, up 5/8” from bottom edge of Crumb Cake cardstock (wrap ribbon around backside of layer on both side edges).
- Adhere panel to the Basic Beige cardstock base.
- Tap Basic Beige ink directly the front side of the Seaside Wishes Hybrid embossing folder. Add the coordinating die and 5 1/4” x 4" Crumb Cake cardstock. Carefully close the embossing folder and run through Stampin’ Cut & Emboss Machine. Save and set aside the inked medium and small sized sand dollars. Stamp 1 large and 1 small Starfish onto Basic Beige card stock using Flirty Flamingo ink, stamp off once before stamping image to be die cut. Die cut Starfish.
- Die cut 1 each of the large and small coral/seaweed textures in both Misty Moonlight cardstock and Basic Beige cardstock.
- Cut a piece of Basic Beige cardstock to 2 1/8” x 7/8”. Stamp with sentiment in Pecan Pie ink. Attach to a 2 1/2” x 1” piece of Crumb cardstock.
- Wrap Linen Thread twice around left side of sentiment piece and tie a bow. Trim excess thread, if necessary.
- Carefully glue and assemble all stamped/die cut pieces as shown in photo.
- Once assembled, attach sentiment block at lower left side of card using Stampin’ Dimensionals.


.jpeg)

.jpeg)


.jpeg)


No comments:
Post a Comment